Just wanted to share the news that our community gardening project has been selected by Friends of the Earth as one of their Bee Worlds. They will be supplying bee friendly seeds to support planting in our village to make it a paradise for pollinators.
Tuesday, 29 April 2014
Friday, 11 April 2014
"Warre yet?" ... "A bit I suppose"
A wonderful wealth of wood wombling* for the weekend.
I have to admit it..."I am a wood wombler*!"
I find it very difficult to throw away pieces of wood that even Isambard Kingdom Brunel would struggle to find some structural application for. This does lead to a very messy/crowded shed. Sometimes it is a matter of open the door, throwing something in, and then closing the door quickly before you action triggers something equal and opposite.
I find it very difficult to throw away pieces of wood that even Isambard Kingdom Brunel would struggle to find some structural application for. This does lead to a very messy/crowded shed. Sometimes it is a matter of open the door, throwing something in, and then closing the door quickly before you action triggers something equal and opposite.
However, one of my favourite pass-times is to stroll (clamber) in and look around see if there is anything I fancy cobbling together. For me being able to find a piece of wood that is exactly the right size for what I want out of this pile of.. well let's be honest.. rubbish is great.
This weekend I took apart a discarded pallet and made a kTBH and... believe it or not... A WARRE HIVE FLOOR! Yes, you heard it, some actually progress towards the project I have outstanding for a while.
I stripped the pallet to pieces (mostly). Clamped three pallet strips (300mm, 12") and then screwed on holding strips to make the sides. The strips help support and straighten the wood. By clamping together first it helped reduce gapping which is always a issue with wood wombling. There wasn't enough good wood to make the ends the way I usually would so I again clamped some pieces together and cut a follower board shape.


I then fixed the sides onto one end, and placed 15 top bars (not wombled) and a spacer strip in place to set where the other end would be fixed.
The remaining half piece of pallet (having removed most of the slats) I laid some aluminium modeling mesh onto and screwed on a frame. This is a double Warre hive stand.. woo hooo! All I need to do now it make the hive to go on it.

The ends were left with a small "lip" at the bottom onto which I decided to add feet. I had a thin strip of mesh as an off-cut from the mesh I used in the warre base so decided to do a mesh floor. The feet then acted as handy runners to allow a board to slide underneath (this board is the first piece of wood to be used not from the pallet).


Gaps are another given when it comes to wood wombling. To fill any large spaces which could act as additional entrances (or more to the point exits) I mix some shellac sanding sealer, wood glue, and saw dust to make a putty and shove it in.

Enter pallet number 2. Just a few pieces from this to make the roof frame. I have made it deep enough to take a piece of insulation board. Topped with feather-edge fence board offcuts.


The outside is finished using raw linseed oil and the inside is painted with a shellac. The finish on the inside is probably not necessary BUT it was just in case the wood had been treated this protects the bees. Most pallets will be marked indicating any treatments (such as bark removal, and heat treatment) so look up the number on the internet before use. Once the coatings had dried I gave the inside a good rub over with beeswax to make it smell homey. The remains of the second pallet became a stand, this is just finished with some spare cuprinol.


Here is a little addition which for the sake of needing a name I will call a "teacher board". It is based on concepts I have followed on some top bar forums.

Basically it is the top part of a follower board. Since this is large bait hive the bees entering it will have to build all the comb. As we all know if they start even a little wonky it can start a wave propagating throughout the hive. This teacher board will be placed one bar in from the front (2nd bar) and will aid in bees starting the 1st and 3rd comb straight. Once started you move it along to the 5th bar (swapping the 5th bar into the gap) where it helps the 4th and 6th bar to start straight. Then onto the 8th, 11th, 14th. they may well build down of off the bottom but that's fine. The holes allow bees to more easily traverse the "comb". I may add more smaller ones.

The entrances are standard drilled holes. One at 1", the other at 3/4" but with the outside at 1" so I can use the same cork size to block the hole. A small piece of ply was added as a landing board.

Since I only have two top bars hive currently made this one may well have to hold a colony for a while so I will be using a few of these:
http://augustcottageapiary.wordpress.com/2014/04/03/finished-your-warre-now-erm-still-not-so-much/At the back end of the hive in case I need to super it during a strong nectar flow.
There we have it a wonderfully warm welcoming wombled wooden weatherproof wonder waiting for willing ....eh... damn .. I also wish it was for wasps!

*"The wombles" was a 1970's TV show in the UK about some tiny creatures who would collect rubbish and make things out of it.
o/~ making good use of the things that we find, things that eveyday folks leave behind o/~

Thursday, 3 April 2014
The Bee Cause

Sorry for the two post day folks but I have only just found this:
The government are performing a review of the pollinators policy and this will close of the 2nd May. Friends of the Earth have provided a guideline plan attached to a petition available both online and in paper form and want to get in all in by 25th April.
Please sign up if you can.
"Finished your warre now?".. "erm... still not so much."
Here is the next bit of fiddling about I have done instead of getting in with a new hive.
Using 40mm battons (to allow for 2mm removal by circular saw) I cut away a strip 9mm wide.
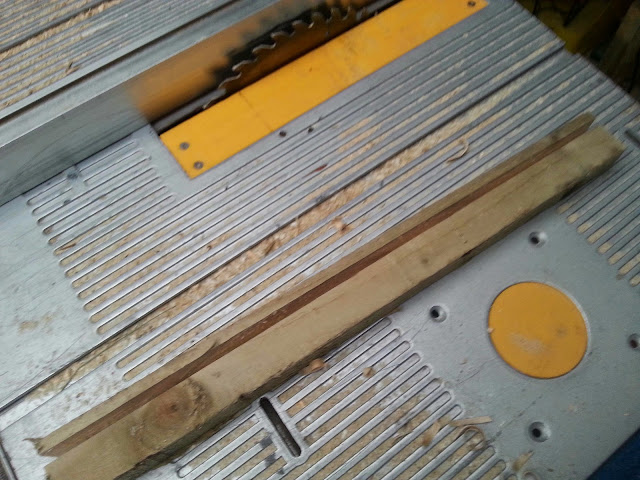
I then cut off each end with a top to bottom angled cut (badly explained so see pic). I did this at 70mm from each end to provide a 300mm gap (430mm topbars).

I then reattach the end pieces to the baton with the narrow side inward.


Add a comb guide and Hey presto! A topbar with a removal section to allow supering. The gap at its widest point is 300mm (12") so it can take warre boxes as supers..... if I ever build them that is :s.


ps.. This little innovation will also work with my previous little project for supering with jars. Simply cut some holes into a piece of ply wood to take the jars and place on top on the superable topbars. This option should more easily allow you to close off specific jars entrances once full and removed.
Wednesday, 2 April 2014
Bee Planting
I am not someone that knows an awful lot about plants. To be honest unless you can eat it... or it is good for starting fires (mis-spent youth) then I have very little idea what it is.
I really want to find some things I can plant in and around my village which are low maintenance, flower yearly, and give the bees some good forage. I am particularly interested in plants that give an early (feb-mar) and late nectar flow (nov-dec) but if it is pretty or smells good then so much the better :)
http://ecowatch.com/2014/04/01/15-plants-to-help-save-bees/
I am at the moment looking at:
Lavender
Thyme
Rosemary
Echinacea
If any of you know anything that might be a good idea PLEASE let me know, thanks.
"Finished your Warre yet?"... "ermm.. no...but!"
Rather than actually do something on my job list last night here is what I did....
... For those who want play along at home here is what you need. Two top bars, two jars, a router, some wax, a pencil (not shown as in a fine wood-working tradition it is behind my ear).
... For those who want play along at home here is what you need. Two top bars, two jars, a router, some wax, a pencil (not shown as in a fine wood-working tradition it is behind my ear).

NB - For those with good eyes; Yes one jar may indeed contain some paint where my daughter has been using it as a wash pot for paint brushes, it will been cleaned before use :)
Now place jars on the top bars in the horizontal centre and draw around (behold proof of pencil presence). Now rout out the area providing somewhere to insert the jars. This helps the jars to remain in place, provides a good seal, keeps the top bars together, and helps it all to fit under roof.


Next drill through using a large drill bit in three places, and then join up the holes. This provides a 9mm (ish) slot. When placed on top bars jars now look like this (Again, I promise to wash off the paint :) ).


Now melt some beeswax to provide a strip across the bottom of the jar so that it is aligned with the top bars. This is the bees starter strip.

Now (in theory) I can put this set up on to the hive to make comb honey in the jar, albeit only two jars at a time. It is also a mini observation hive. The slots can be corked up if they are going to be left in the hive. I will have a go and give an update later. I have already thought of half a dozen better ways of doing this. Please post your ideas for similar.
August Cottage Apiary is Dead... Long live August Cottage Apiary.
Well.. the deed is done.
Last night I masking taped up the hive entrance. Removed the roof (to try and make it a little lighter), and along with a helper carried the hive the 300yds or so across the field where the hive was kept to my waiting camper for moving. I may have slightly mis-calculated the required space which lead to us having the remove the kitchen from the camper and abandon it at the end of the field for later pickup. The bees were extremely quiet throughout the slow journey to their new location about 1/4 mile away. They didn't even complain when I nearly dropped them after getting my leg tangled in a fence whilst we lifted the hive over. My helper Tom managed to not get in the least bit exasperated with me, at least visibly. Once the hive was levelled up I headed to the old location (retrieved the camper kitchen) and placed a bait hive there with the entrance in roughly the same place as the old hives. The idea being any foragers that head out today may go back to the old hive location and at least they'll have some shelter until I go pick them up and take them back.
I remembered after I had gone to bed that I needed to stuff the entrance with grass to promote "reorientation", but I managed to get over there this morning before the bees got up. *sigh* let's hope they settle into the new August Cottage Apiary. Hopeful I'll be able to move my new (as yet uninhabited hives) over there at the weekend.
New Site.. New Hive
Well now I have somewhere to put my hives I have sited my new kenya top bar hive. It is an entirely non-standard 51" long (unless you usually cut ikea worktop in half longways), and can take about 32 topbars and a couple of follower boards.

(No my labrador isn't a miniture breed, it's just perspective :) )
This one has an entrance at each end which my children have decorated for me.
This one has an entrance at each end which my children have decorated for me.


These are periscope style entrances, entering low outside, high inside. This should be big enough to take two colonies this year if I am lucky. There are also smaller entrances just under half way on each side to aid with splits and save the bees having to move through the whole brood nest during a heavy nectar flow. I have cheated a bit and hinged the roof as i didn't fancy lifting off a roof this large everytime I needed to inspect. All I need now is the bees!
Belated Bees
Well, it has been several days since moving the hive. Although it was only 1/4 mile no bees ended up back at the old hive location. I haven't been able to check on them during the week because of work but they are certainly out flying today and bringing in pollens orange and gold. Bring on the Spring!
Moving Day
Well the guy who lets me keep my bees on his land has changed his mind. He wants to turn the land over to livestock so the bees have to go! I have spent several days worrying about what to do, especially since I have started placing out bait hives to catch more bees and have several hives in my backgarden that need to be put somewhere. However, following a tip I have managed to find a kind soul who will let me place the bees on a field border. Kenyan top bar hives are not easy to move so I am going to have a hell of a time shifting it this evening. I will let you know how it goes.
Bait Hives and Hope for the Future
Well this month I am going to be concentrating mostly on trying to get myself some more bees.
I checked on my current colony and the weekend and they are flying and bringing on pollen. That is a very good sign as it means that the queen has started laying again. This colony was a very small cast swarm that I caught at the end of July 2013. The chances of a cast swarm making through the winter is only about 1/4 at the best of times so one this late getting through is a good sign.
Over winter I have built myself a new topbar hive and a few bait hives (or eight) and am now putting them out and about hoping to catch myself some more bees during spring. Here is a article I did for homestead.org on how to: http://homestead.org/AndrewBotham/BeesForFree/FreeBees.htm
Subscribe to:
Comments (Atom)